Development Guide
This document provides comprehensive instructions for developers working on the JIIT Timetable Creator. It covers environment setup, development workflows, modifying Python processing logic, managing timetable data, and deployment procedures.
For information about the system architecture, see System Architecture. For details on specific features, refer to pages 4 through 10.
Environment Setup
Prerequisites
The following software must be installed on your development machine:
| Tool | Minimum Version | Purpose |
|---|---|---|
| Node.js | 16.x or higher | JavaScript runtime |
| bun or npm | Latest stable | Package manager |
| Python | 3.8+ | For data preparation scripts |
| Git | Latest | Version control |
Installation Steps
Step 1: Clone Repository
git clone https://github.com/tashifkhan/JIIT-time-table-website
cd JIIT-time-table-website
Step 2: Install Dependencies
Using bun (recommended):
bun install
Using npm:
npm install
Step 3: Start Development Server
Using bun:
bun dev
Using npm:
npm run dev
The application will be available at http://localhost:5173
Step 4: Verify Setup
Access the application in a browser and confirm:
- The form loads without errors
- Pyodide initializes (check browser console)
- Static JSON data loads from
/data/time-table/ODD25/
Project Structure Reference
The codebase is organized into distinct layers with clear separation of concerns:
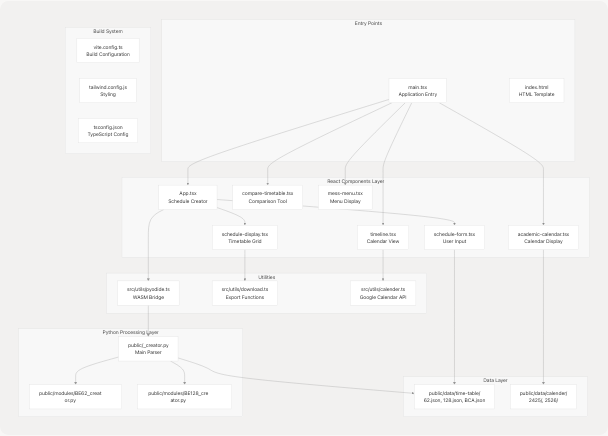
Key Directories
| Directory | Purpose | Key Files |
|---|---|---|
src/ |
React application source | App.tsx, main.tsx |
src/components/ |
UI components | schedule-form.tsx, schedule-display.tsx, timeline.tsx |
src/utils/ |
Helper utilities | pyodide.ts, download.ts, calender.ts |
src/context/ |
State management | userContext.ts, userContextProvider.tsx |
public/ |
Static assets | _creator.py, manifest.json, service-worker.js |
public/data/ |
JSON data files | time-table/, calender/ |
public/modules/ |
Python modules | BE62_creator.py, BE128_creator.py |
Development Workflow
Development Cycle
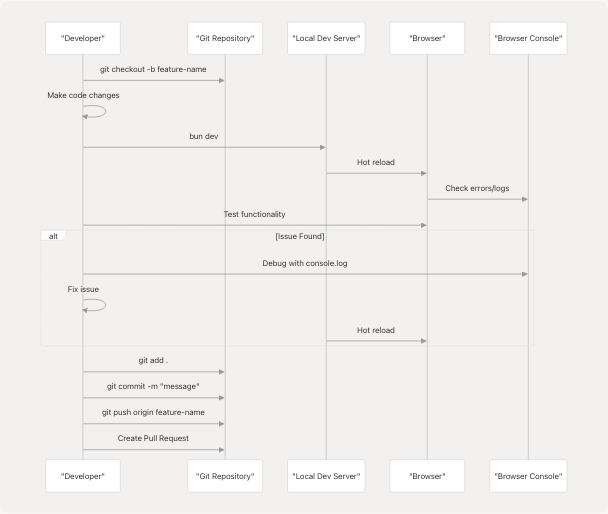
Hot Module Replacement
The development server uses Vite's HMR (Hot Module Replacement). Changes to the following trigger automatic reloads:
- React Components (
.tsx,.jsx): Instant update without page refresh - CSS/Tailwind (
.css): Instant style injection - TypeScript (
.ts): Compiles and updates affected modules - Python Files (
_creator.py): Requires manual page refresh to reload Pyodide
Debugging Tools
Browser Console Logging
Key log points in the application:
- src/App.tsx140: Logs selected Python function name
- src/App.tsx174-178: Logs mapping data and form inputs
- public/_creator.py429-437: Logs processing inputs in Python
React DevTools
Install React DevTools browser extension to inspect:
- Component hierarchy
- Props and state
- Context values from
UserContext
Network Tab Inspection
Monitor these requests:
/data/time-table/ODD25/62.json- Timetable data- Pyodide CDN requests during initialization
/_creator.pyfetch during Pyodide setup
Adding New Features
Feature Addition Workflow

Example: Adding a New Page
Step 1: Create Component File
Create src/components/new-feature.tsx:
import React from 'react';
import { motion } from 'framer-motion';

export const NewFeature: React.FC = () => {
  return (
    <motion.div
      initial={{ opacity: 0 }}
      animate={{ opacity: 1 }}
    >
      {/* Feature content */}
    </motion.div>
  );
};
Step 2: Add Route
Update src/main.tsx22-50:
import { NewFeature } from './components/new-feature';

// In Routes:
<Route path="/new-feature" element={<NewFeature />} />
Step 3: Add Navigation Link
Update src/components/navbar.tsx to add navigation item.
Step 4: Add to Context (if needed)
If feature requires global state, update src/context/userContext.ts and src/context/userContextProvider.tsx
Example: Adding New Timetable Processing Logic
Step 1: Define Python Function
Add to public/_creator.py:
def custom_processor(
    time_table_json: dict,
    subject_json: list,
    batch: str,
    custom_param: str
) -> dict:
    """
    Process timetable with custom logic.
    """
    formatted_timetable = {}
    # Implementation
    return formatted_timetable
Step 2: Update Function Selection
Modify src/App.tsx115-152 in evaluteTimeTable:
let functionName;
if (customCondition) {
  functionName = "custom_processor";
} else {
  // existing logic
}
Step 3: Call Function
The existing callPythonFunction at src/App.tsx141-146 will handle the new function automatically.
Modifying Python Modules
Python Module Architecture
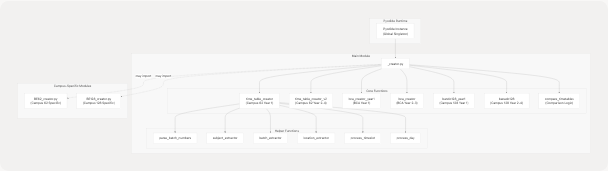
Understanding Python Functions
Function Naming Convention
| Function Name | Campus | Year | Description |
|---|---|---|---|
time_table_creator |
62 | 1 | First year with basic batch parsing |
time_table_creator_v2 |
62 | 2-4 | Advanced years with elective matching |
bca_creator_year1 |
BCA | 1 | BCA first year logic |
bca_creator |
BCA | 2-3 | BCA higher years |
bando128_year1 |
128 | 1 | Campus 128 first year |
banado128 |
128 | 2-4 | Campus 128 higher years |
Key Helper Functions
-
parse_batch_numbers(batch_input: str) -> list[str]public/_creator.py8-94- Handles various batch formats: "A15", "A15-A17", "A15,A16", "ABC"
- Returns list of individual batch identifiers
-
subject_extractor(text: str) -> strpublic/_creator.py177-208- Extracts subject code from activity string
- Handles formats like "L(CS101-A15)" → "CS101"
-
batch_extractor(text: str) -> strpublic/_creator.py158-174- Extracts batch specification from activity string
- Handles formats like "L(CS101-A15)" → "A15"
-
process_timeslot(timeslot: str, type: str) -> tuple[str, str]public/_creator.py364-421- Converts time formats: "9:00 AM-10:00 AM" → ("09:00", "10:00")
- Handles special cases like "NOON" and missing AM/PM indicators
Modifying Existing Functions
Example: Updating Batch Parsing Logic
To modify how batch numbers are parsed, edit public/_creator.py8-94:
- Locate the
parse_batch_numbersfunction - Add new parsing logic for special cases
- Test with various batch formats
- Update unit tests if they exist
Example: Adding New Subject Code Pattern
To handle a new subject code format in subject_name_extractor public/_creator.py220-253:
# Add new pattern in the patterns list
patterns = [
    full_code,
    full_code[:2] + subject["Code"],
    full_code[3:],
    # Add new pattern here
    full_code[:3] + subject["Code"][1:],
]
Testing Python Changes
Method 1: Browser Console Testing
After modifying Python files:
- Hard refresh browser (Ctrl+Shift+R / Cmd+Shift+R)
- Open browser console
- Generate a timetable
- Check console logs for Python print statements
Method 2: Direct Python Testing
Create a test script test_parser.py:
import json
from _creator import parse_batch_numbers, subject_extractor

# Test batch parsing
assert parse_batch_numbers("A15-A17") == ["A15", "A16", "A17"]

# Test subject extraction
assert subject_extractor("L(CS101-A15)") == "CS101"

print("All tests passed!")
Run: python test_parser.py
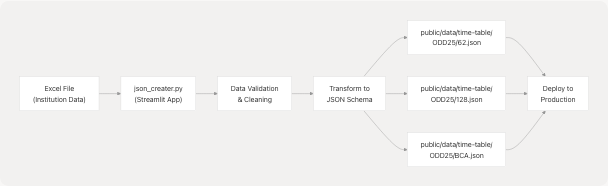
Creating and Updating Timetable Data
Data Preparation Pipeline
JSON Data Schema
Timetable JSON files follow this structure:
{
  "1": {
    "subjects": [
      {
        "Code": "CS101",
        "Full Code": "22B11CS101",
        "Subject": "Introduction to Programming"
      }
    ],
    "timetable": {
      "Monday": {
        "09:00 AM - 09:50 AM": [
          "L(CS101-A15)-101/LH1"
        ]
      }
    }
  }
}
Schema Components
| Field | Type | Description | Example |
|---|---|---|---|
| Year Key | string |
Academic year ("1", "2", "3", "4") | "1" |
subjects |
array |
List of subject metadata | See below |
timetable |
object |
Day-wise schedule | See below |
Subject Object
{
  "Code": "CS101",
  "Full Code": "22B11CS101",
  "Subject": "Introduction to Programming"
}
Timetable Activity String Format
Pattern: <Type>(<SubjectCode>-<Batch>)-<Location>/<Faculty>
Examples:
L(CS101-A15)-101/LH1- Lecture for CS101, batch A15, room 101/LH1T(CS101-A15,A16)-202- Tutorial for batches A15 and A16P(CS101-ABC)-Lab1- Practical for batches A, B, C
Activity Type Codes
| Code | Type | Duration Adjustment |
|---|---|---|
L |
Lecture | Standard (50 min) |
T |
Tutorial | Standard (50 min) |
P |
Practical | +1 hour from end time |
C |
Combined | Standard (50 min) |
Using the Streamlit Data Creator
Step 1: Install Dependencies
pip install streamlit pandas openpyxl
Step 2: Run Streamlit App
streamlit run json_creater.py
Step 3: Upload Excel File
The app expects Excel with these sheets:
- Sheet for each year (1, 2, 3, 4)
- Columns: Day, Time, Subject Code, Batch, Location
Step 4: Download Generated JSON
The app generates JSON files for each campus (62, 128, BCA).
Step 5: Place Files in Project
Move generated files to:
public/data/time-table/ODD25/62.json
public/data/time-table/ODD25/128.json
public/data/time-table/ODD25/BCA.json
Manual JSON Editing
For minor corrections, edit JSON files directly:
Adding a New Class
"Monday": {
  "09:00 AM - 09:50 AM": [
    "L(CS101-A15)-101/LH1",
    "L(CS102-A16)-102/LH2"  // Add new entry
  ]
}
Updating Subject Name
"subjects": [
  {
    "Code": "CS101",
    "Full Code": "22B11CS101",
    "Subject": "Updated Subject Name"  // Modify here
  }
]
Adding New Semester Data
To add a new semester (e.g., EVEN26):
- Create directory:
public/data/time-table/EVEN26/ - Generate JSON files for each campus
- Update fetch URLs in src/App.tsx44-52:
fetch("/data/time-table/EVEN26/62.json")
  .then((res) => res.json())
  .then(setMapping62);
- Update logic to dynamically select semester based on current date
Testing and Quality Assurance
Testing Checklist
Unit Testing (Manual)
| Component | Test Case | Expected Result |
|---|---|---|
| Pyodide Initialization | Load page | Console logs "Pyodide loaded" |
| Batch Parsing | Input "A15-A17" | Returns ["A15", "A16", "A17"] |
| Schedule Generation | Submit form | Displays timetable grid |
| Export PDF | Click export | Downloads PDF file |
| Google Calendar | Click sync | Opens OAuth flow |
Integration Testing
Test the complete workflow:

- Fill schedule form with valid data
- Verify schedule generates correctly
- Edit a time slot using EditEventDialog
- Refresh page - confirm edits persist
- Export to PDF/PNG - verify download
- Sync to Google Calendar - verify events created
Browser Compatibility
Test in these browsers:
| Browser | Version | Priority |
|---|---|---|
| Chrome | Latest | High |
| Firefox | Latest | High |
| Safari | Latest | Medium |
| Edge | Latest | Medium |
| Mobile Chrome | Latest | High |
| Mobile Safari | Latest | High |
Common Issues and Fixes
Issue: Pyodide Not Loading
Symptoms: Form submission results in no schedule
Fix:
- Check browser console for WASM errors
- Verify
_creator.pyis accessible at/public/_creator.py - Clear browser cache
- Check if browser supports WebAssembly
Issue: Schedule Generation Hangs
Symptoms: Loading indicator never stops
Debug:
- Open browser console
- Look for Python exceptions
- Verify JSON data structure matches expected format
- Check src/App.tsx115-152 function selection logic
Issue: Edited Events Not Persisting
Symptoms: Custom events disappear on refresh
Fix:
- Check localStorage in browser DevTools
- Verify
editedSchedulekey exists - Inspect src/context/userContextProvider.tsx localStorage logic
Build and Deployment
Build Process
Local Production Build
Step 1: Build Application
bun run build
or
npm run build
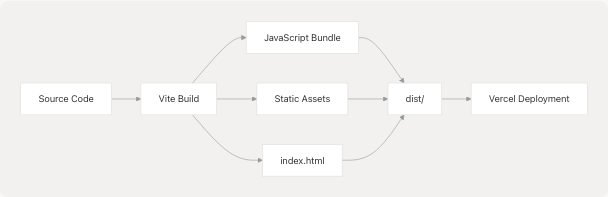
This generates the dist/ directory with:
- Minified JavaScript bundles
- Optimized CSS
- Static assets (JSON, Python files)
- Service worker for PWA
Step 2: Preview Build
bun run preview
or
npm run preview
Access at http://localhost:4173
Deployment to Vercel
Automated Deployment
The repository is configured for automatic deployment on push to main branch.
Manual Deployment
vercel --prod
Vercel Configuration
The vercel.json1-16 file configures:
- PostHog Analytics Proxy - Routes
/ph/*requests to PostHog - SPA Routing - Rewrites all routes to
index.html
{
  "rewrites": [
    {
      "source": "/ph/(.*)",
      "destination": "https://eu.i.posthog.com/$1"
    },
    {
      "source": "/(.*)",
      "destination": "/index.html"
    }
  ]
}
Environment Variables
No environment variables are required for basic deployment. For analytics:
| Variable | Purpose | Required |
|---|---|---|
VITE_PUBLIC_POSTHOG_KEY |
PostHog analytics key | Optional |
Set in Vercel dashboard under Project Settings → Environment Variables.
PWA Deployment
The application includes Progressive Web App support via public/service-worker.js and public/manifest.json
Verify PWA Installation
After deployment:
- Open site in Chrome
- Check address bar for install icon
- Click install
- Verify app opens as standalone
Update Service Worker
When modifying cached resources, update version in public/service-worker.js:
const CACHE_VERSION = 'v2.0.0'; // Increment version
Post-Deployment Verification
Checklist
- Navigate to deployed URL
- Verify Pyodide loads (check console)
- Generate a timetable successfully
- Test export to PDF/PNG
- Test Google Calendar integration
- Verify PWA installability
- Test on mobile devices
- Check analytics reporting (if enabled)
Monitoring
Use Vercel Analytics and PostHog (if configured) to monitor:
- Page load times
- User interactions
- Error rates
- Browser/device distribution
Code Style Guidelines
TypeScript/React Conventions
Component Structure
// 1. Imports
import React, { useContext, useState } from 'react';
import { ComponentProps } from './types';

// 2. Type definitions
interface Props {
  data: string;
  onSubmit: (value: string) => void;
}

// 3. Component
export const Component: React.FC<Props> = ({ data, onSubmit }) => {
  // 3a. Hooks
  const [state, setState] = useState('');

  // 3b. Handlers
  const handleClick = () => {
    onSubmit(state);
  };

  // 3c. Render
  return (
    <div>{/* JSX */}</div>
  );
};
Naming Conventions
| Type | Convention | Example |
|---|---|---|
| Components | PascalCase | ScheduleForm |
| Functions | camelCase | handleFormSubmit |
| Constants | UPPER_SNAKE_CASE | DEFAULT_CAMPUS |
| Types/Interfaces | PascalCase | YourTietable |
| Files | kebab-case | schedule-form.tsx |
Python Conventions
Follow PEP 8 standards:
- Use 4 spaces for indentation
- Function names in snake_case
- Type hints for function signatures
- Docstrings for public functions
def parse_batch_numbers(batch_input: str) -> list[str]:
    """
    Parse batch number formats and return array of individual batches.

    Args:
        batch_input: Raw batch string (e.g., "A15-A17")

    Returns:
        List of individual batch identifiers
    """
    # Implementation
Contributing Workflow
Pull Request Process
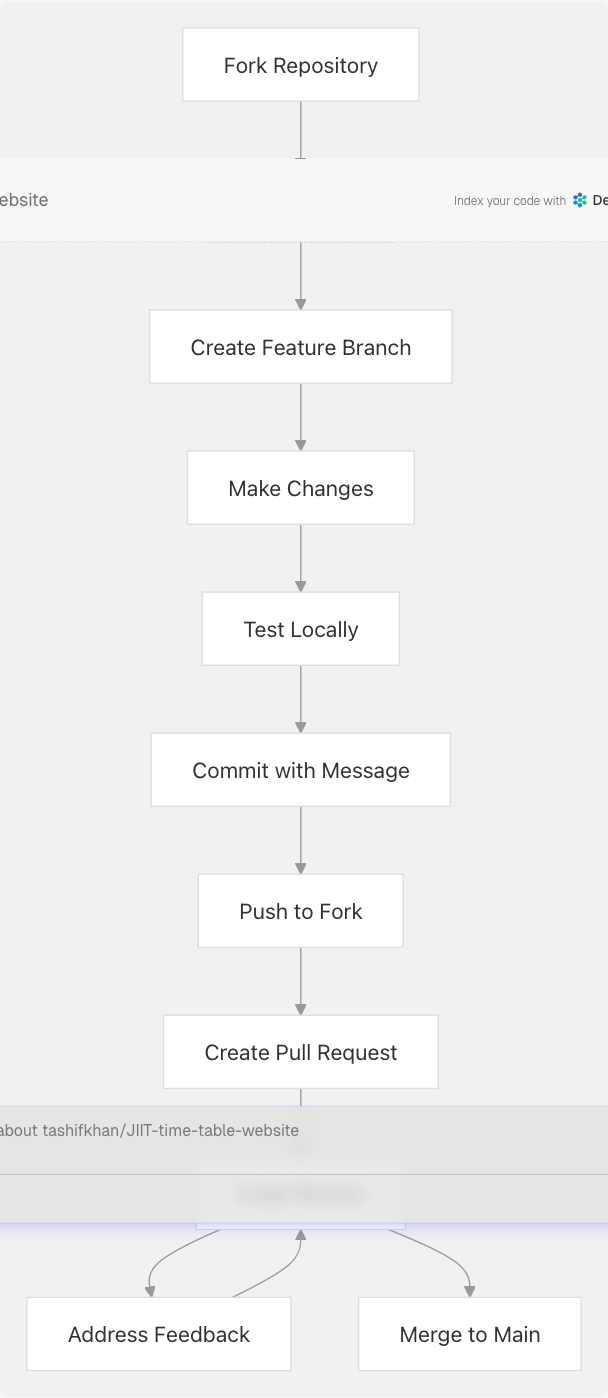
Step-by-Step Guide
-
Fork and Clone
git clone https://github.com/YOUR_USERNAME/JIIT-time-table-website cd JIIT-time-table-website
-
Create Feature Branch
git checkout -b feature/descriptive-name
-
Make Changes
- Write code following style guidelines
- Test thoroughly
- Update documentation if needed
-
Commit Changes
git add . git commit -m "feat: add descriptive feature name"
Commit message format:
feat:New featurefix:Bug fixdocs:Documentation changesstyle:Code style changesrefactor:Code refactoringtest:Adding tests
-
Push and Create PR
git push origin feature/descriptive-name
Then create Pull Request on GitHub with:
- Clear description of changes
- Screenshots if UI changes
- Testing steps performed
Code Review Guidelines
Reviewers check for:
- Code follows style guidelines
- Changes are well-tested
- No breaking changes to existing features
- Documentation is updated
- Performance implications considered
Advanced Topics
Adding New Campus Support
To add support for a new campus (e.g., Campus 227):
Step 1: Create Python Parser Function
Add to public/_creator.py:
def campus227_creator(
    time_table_json: dict,
    subject_json: list,
    batch: str,
    electives: list[str]
) -> dict:
    # Campus-specific logic
    pass
Step 2: Update Function Selection
Modify src/App.tsx115-152 evaluteTimeTable:
let functionName;
if (campus === "227") {
  functionName = year === "1"
    ? "campus227_creator_year1"
    : "campus227_creator";
} else {
  // existing logic
}
Step 3: Add Data Files
Create public/data/time-table/ODD25/227.json following the schema.
Step 4: Update Form Options
Add "227" to campus dropdown in src/components/schedule-form.tsx
Optimizing Pyodide Load Time
Pyodide initialization is ~10MB download. Optimization strategies:
- Lazy Load Pyodide Only initialize when user submits form (already implemented in src/App.tsx183-185)
- Cache Pyodide Instance Store loaded instance globally (already implemented in src/utils/pyodide.ts)
- Preload in Service Worker Update public/service-worker.js to cache Pyodide CDN resources
- Use CDN with HTTP/2 Pyodide CDN already uses HTTP/2 for faster parallel downloads
Implementing Custom Export Formats
To add new export format (e.g., iCal):
Step 1: Create Export Function
Add to src/utils/download.ts:
export const exportToICAL = (schedule: YourTietable) => {
  // Generate iCal format string
  const icalContent = generateICAL(schedule);

  // Trigger download
  const blob = new Blob([icalContent], { type: 'text/calendar' });
  const url = URL.createObjectURL(blob);
  const a = document.createElement('a');
  a.href = url;
  a.download = 'timetable.ics';
  a.click();
};
Step 2: Add Button
Update src/components/action-buttons.tsx or src/components/schedule-display.tsx to include new export button.