Getting Started
This document provides instructions for running JPortal locally for development, configuring the application, and deploying it. It covers installation of dependencies, environment configuration, development workflows, and building the Progressive Web App for production.
For information about the overall architecture and design patterns, see Architecture Overview. For details about individual feature modules, see Feature Modules.
Prerequisites
Before setting up JPortal locally, ensure you have the following installed:
| Requirement | Minimum Version | Purpose |
|---|---|---|
| Node.js | 18.x or higher | JavaScript runtime |
| npm | 9.x or higher | Package manager |
| Git | Any recent version | Version control |
| Modern Browser | Latest Chrome/Firefox/Safari | Development and testing |
Sources: jportal/package.json1-66
Quick Start: Using the Live Application
JPortal is deployed as a Progressive Web App and can be accessed immediately without local setup.
Accessing the Application
- Navigate to https://codeblech.github.io/jportal/
- Login with your JIIT credentials (real mode) or use demo mode

Diagram 1: Application Access Flow
Sources: README.md36-38 jportal/package.json6
Installing as PWA
JPortal can be installed on various platforms for app-like experience:
| Platform | Installation Steps |
|---|---|
| Android (Chrome) | 1. Tap the three-dot menu icon 2. Tap "Add to Home screen" 3. Press "Install" in the popup |
| iOS (Safari) | 1. Tap the Share button 2. Select "Add to Home Screen" 3. Tap "Add" |
| Windows (Chrome/Edge) | 1. Click the install icon in the URL bar 2. Click "Install" |
Sources: README.md39-44
Local Development Setup
Step 1: Clone the Repository
git clone https://github.com/codeblech/jportal.git
cd jportal
Step 2: Navigate to Project Directory
The main application code is located in the jportal subdirectory:
cd jportal
Step 3: Install Dependencies
npm install
This installs all dependencies defined in jportal/package.json15-43 including:
- React 18.3.1 - UI framework
- Vite 5.4.10 - Build tool and dev server
- VitePWA 0.20.5 - Progressive Web App plugin
- Radix UI - Accessible component primitives
- TanStack Query - Server state management
- Zustand - Theme state management
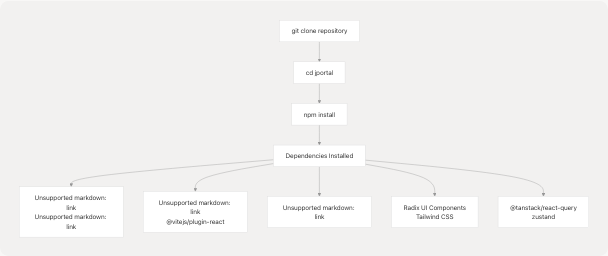
Diagram 2: Dependency Installation Process
Sources: jportal/package.json15-65
Environment Configuration
JPortal uses environment variables for configuration. Create a .env file in the jportal directory.
Creating the Environment File
Copy the example file:
cp .env.example .env
Environment Variables
| Variable | Purpose | Default | Required |
|---|---|---|---|
VITE_USE_FAKE_DATA |
Enable demo mode with mock data | false |
No |
VITE_CLOUDFLARE_API_TOKEN |
Cloudflare Analytics API token | (example token) | For stats page |
VITE_CLOUDFLARE_PROXY_URL |
CORS proxy for Cloudflare API | (worker URL) | For stats page |
VITE_CLOUDFLARE_BASE_URL |
Cloudflare GraphQL endpoint | https://api.cloudflare.com/client/v4/graphql |
For stats page |
VITE_CLOUDFLARE_ACCOUNT_TAG |
Cloudflare account identifier | (example tag) | For stats page |
VITE_CLOUDFLARE_SITE_TAG |
Cloudflare site identifier | (example tag) | For stats page |
Configuration File Structure:
VITE_USE_FAKE_DATA=false
VITE_CLOUDFLARE_API_TOKEN=your_token_here
VITE_CLOUDFLARE_PROXY_URL=https://cors-header-proxy.my-malikyash.workers.dev
VITE_CLOUDFLARE_BASE_URL=https://api.cloudflare.com/client/v4/graphql
VITE_CLOUDFLARE_ACCOUNT_TAG=your_account_tag
VITE_CLOUDFLARE_SITE_TAG=your_site_tag
Sources: jportal/.env.example1-7
Demo Mode vs Real Mode
The VITE_USE_FAKE_DATA variable controls which data source the application uses:
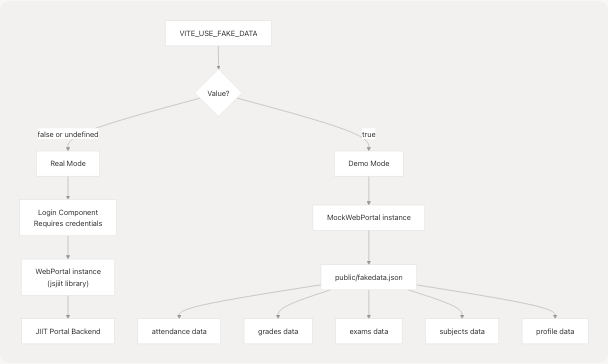
Diagram 3: Mode Selection and Data Flow
The mode is determined in App.jsx where either WebPortal or MockWebPortal is instantiated based on the environment variable.
Sources: jportal/.env.example1 jportal/vite.config.ts10
Running the Application
Development Server
Start the Vite development server with hot module replacement:
npm run dev
This executes the dev script defined in jportal/package.json8 The application will be available at:
- Local:
http://localhost:5173/jportal/ - Network:
http://<your-ip>:5173/jportal/
Note: The base path /jportal/ is configured in jportal/vite.config.ts13
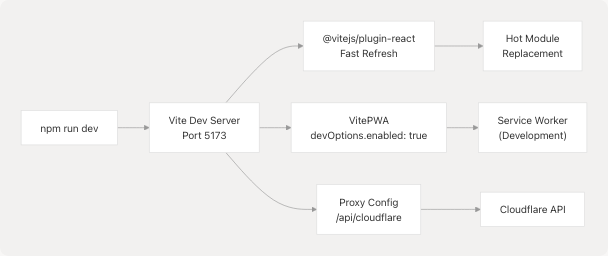
Diagram 4: Development Server Architecture
Sources: jportal/package.json8 jportal/vite.config.ts1-99
Development Server Features
The Vite configuration provides:
- Hot Module Replacement (HMR) - Instant updates without full page reload
- PWA in Development - Service worker enabled via
devOptions.enabled: true(jportal/vite.config.ts20-22) - API Proxy - Cloudflare API proxy to avoid CORS issues (jportal/vite.config.ts81-96)
- Path Aliases -
@/resolves to./src(jportal/vite.config.ts76-78)
Preview Production Build
To preview the production build locally:
npm run build
npm run preview
The preview command serves the dist/ directory on a local server.
Sources: jportal/package.json9-11
Linting
Run ESLint to check code quality:
npm run lint
Sources: jportal/package.json10
Building for Production
Build Process
Create an optimized production build:
npm run build
This command:
- Compiles TypeScript to JavaScript
- Bundles React components with Vite
- Minifies and tree-shakes code
- Generates PWA manifest and service worker
- Outputs to
dist/directory
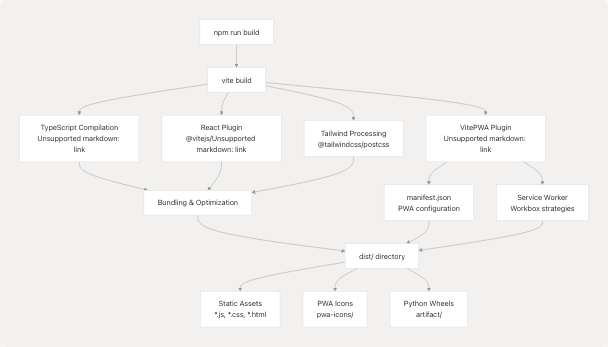
Diagram 5: Production Build Pipeline
Sources: jportal/package.json9 jportal/vite.config.ts17-73
Build Configuration Details
The production build is configured in jportal/vite.config.ts1-99 with:
PWA Configuration
- Register Type:
autoUpdate- Automatically updates service worker - Inject Register:
auto- Automatically injects service worker registration - Maximum Cache Size: 30MB (jportal/vite.config.ts24)
- Glob Patterns: Caches all
*.js,*.css,*.html,*.ico,*.png,*.svg,*.whlfiles
Cached Resources
The service worker pre-caches:
- Pyodide Runtime:
https://cdn.jsdelivr.net/pyodide/v0.23.4/full/pyodide.js - Python Wheels:
/jportal/artifact/jiit_marks-0.2.0-py3-none-any.whl/jportal/artifact/PyMuPDF-1.24.12-cp311-abi3-emscripten_3_1_32_wasm32.whl
These are used by the Grades module for client-side PDF parsing.
Sources: jportal/vite.config.ts23-42
Manifest Configuration
The PWA manifest (jportal/vite.config.ts44-72) defines:
{
  "name": "JPortal",
  "short_name": "JPortal",
  "start_url": "/jportal/",
  "display": "standalone",
  "background_color": "#191c20",
  "theme_color": "#191c20",
  "orientation": "portrait",
  "icons": [...]
}
Sources: jportal/vite.config.ts44-72
Deployment
Deploying to GitHub Pages
JPortal uses gh-pages for automated deployment:
npm run deploy
This command:
- Runs
npm run build(viapredeployhook) - Deploys the
dist/directory to thegh-pagesbranch - Makes the app available at
https://codeblech.github.io/jportal

Diagram 6: Deployment Process
Sources: jportal/package.json12-13
Deployment Configuration
Key configuration for GitHub Pages:
| Setting | Value | File Reference |
|---|---|---|
| Homepage URL | https://codeblech.github.io/jportal |
jportal/package.json6 |
| Base Path | /jportal/ |
jportal/vite.config.ts13 |
| Deploy Command | gh-pages -d dist |
jportal/package.json13 |
| Build Output | dist/ directory |
jportal/vite.config.ts9-99 |
Sources: jportal/package.json6-13 jportal/vite.config.ts13
Development Workflow Summary

Diagram 7: Complete Development Workflow
Sources: jportal/package.json7-13
Common Commands Reference
| Command | Purpose | When to Use |
|---|---|---|
npm install |
Install all dependencies | Initial setup, after pulling changes |
npm run dev |
Start development server | Active development |
npm run build |
Create production build | Before deployment, testing build |
npm run preview |
Preview production build | Test production build locally |
npm run lint |
Run ESLint | Code quality checks, before commits |
npm run deploy |
Deploy to GitHub Pages | Production deployment |
Sources: jportal/package.json7-13
Project Structure Overview
After setup, the project structure is:
jportal/
├── public/              # Static assets
│   ├── fakedata.json   # Mock data for demo mode
│   ├── pwa-icons/      # PWA icons
│   └── artifact/       # Python wheels for PDF parsing
├── src/                # Application source code
│   ├── components/     # React components
│   ├── lib/           # Utilities and helpers
│   └── main.jsx       # Application entry point
├── .env               # Environment variables (create from .env.example)
├── package.json       # Dependencies and scripts
├── vite.config.ts     # Vite and PWA configuration
└── index.html         # HTML shell for PWA
Sources: jportal/package.json1-66 jportal/vite.config.ts1-99
Next Steps
After completing the setup:
- Understand the Architecture - See Architecture Overview for system design patterns
- Explore Feature Modules - See Feature Modules for detailed component documentation
- Learn the Theme System - See Theme System for customization options
- Review State Management - See State Management Strategy for data flow patterns
- Study the Build Pipeline - See Build & Deployment for advanced build configuration
Sources: README.md1-61 jportal/package.json1-66 jportal/vite.config.ts1-99