Getting Started
- .python-version
- core/config.py
- main.py
- pyproject.toml
- routers/browser_use.py
- tools/google_search/__init__.py
- tools/google_search/seach_agent.py
- uv.lock
This guide walks you through the initial setup and execution of the Agentic Browser system. You will learn how to install dependencies, configure environment variables, and run the application in either API server mode or MCP (Model Context Protocol) server mode.
For detailed information about specific components:
- For dependency details and package management, see Installation and Dependencies
- For comprehensive environment variable configuration, see Configuration and Environment Variables
- For detailed runtime options and command-line arguments, see Running the Application
Prerequisites
The Agentic Browser requires Python 3.12 or higher. The project uses uv for dependency management, though standard pip installation is also supported.
Required:
- Python 3.12+ (specified in .python-version1)
- Package manager:
uv(recommended) orpip
Recommended:
- Git (for cloning the repository)
- API keys for LLM providers (at minimum one of: Google Gemini, OpenAI, Anthropic, or Ollama)
Installation Overview
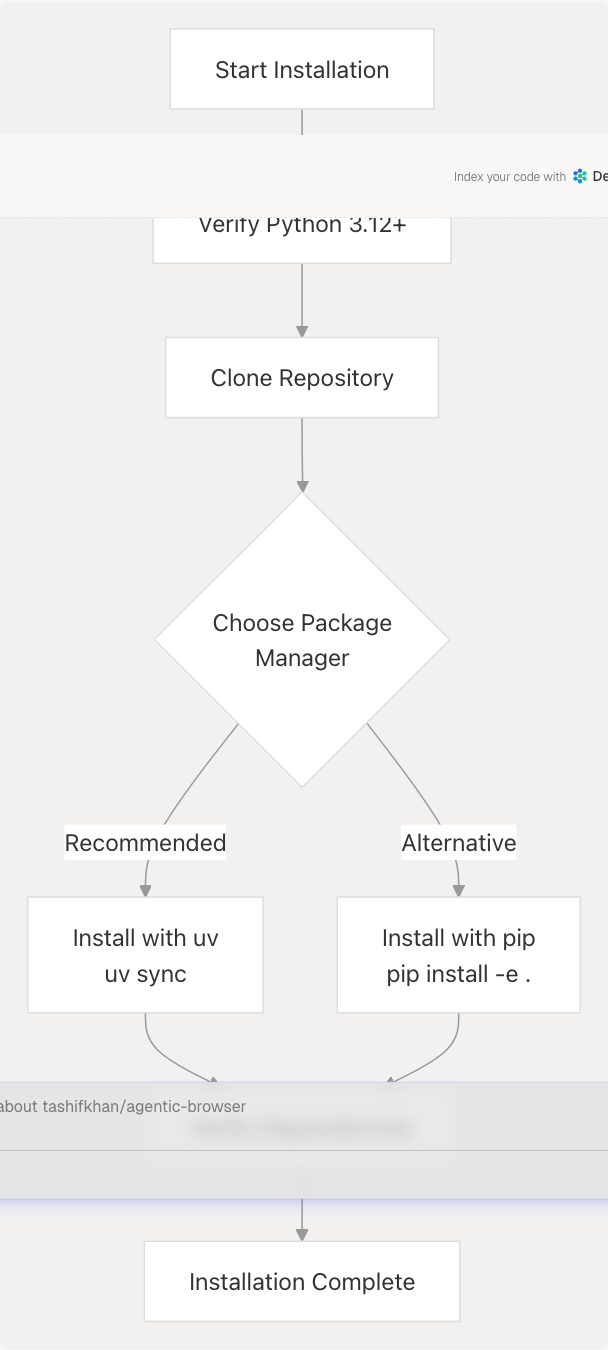
Quick Installation Steps
-
Verify Python version:
python --version # Should be 3.12 or higher -
Clone the repository:
git clone https://github.com/tashifkhan/agentic-browser cd agentic-browser -
Install dependencies:
# Using uv (recommended)
uv sync
OR using pip
pip install -e .
The project defines 28 core dependencies in pyproject.toml7-28 including:
- FastAPI and Uvicorn for the API server
- LangChain and LangGraph for agent orchestration
- Multiple LLM provider integrations (Google, OpenAI, Anthropic, Ollama)
- Specialized tools (gitingest, yt-dlp, faster-whisper, BeautifulSoup)
For a complete dependency breakdown, see Installation and Dependencies.
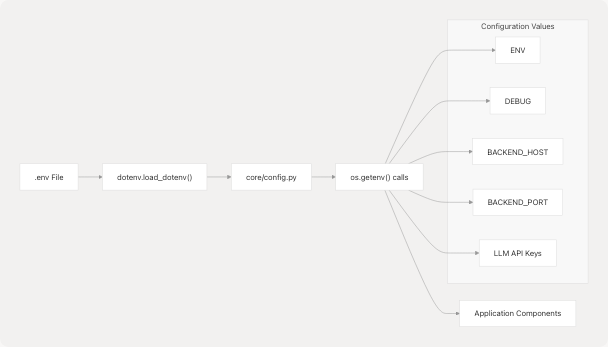
Configuration Setup
Environment Variable Configuration Flow
Essential Configuration
Create a .env file in the project root with the following structure:
| Variable Category | Variables | Required | Default |
|---|---|---|---|
| Application | ENV |
No | development |
DEBUG |
No | true (dev), false (prod) |
|
BACKEND_HOST |
No | 0.0.0.0 |
|
BACKEND_PORT |
No | 5454 |
|
| LLM Providers | GOOGLE_API_KEY |
Conditional | - |
OPENAI_API_KEY |
Conditional | - | |
ANTHROPIC_API_KEY |
Conditional | - | |
OLLAMA_BASE_URL |
Conditional | - | |
| External Services | TAVILY_API_KEY |
For web search | - |
| Google OAuth credentials | For Gmail/Calendar | - |
Minimal .env example:
ENV=development
DEBUG=true
GOOGLE_API_KEY=your_gemini_api_key_here
TAVILY_API_KEY=your_tavily_key_here
The configuration system loads environment variables through core/config.py5-6 using dotenv.load_dotenv(), then exposes them via getter functions like core/config.py22-25 for logging configuration.
For complete environment variable documentation and service-specific configuration, see Configuration and Environment Variables.
Running the Application
Application Entry Point Architecture
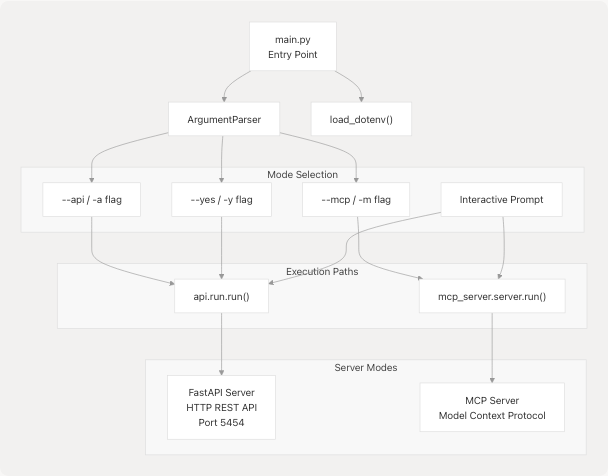
Starting the Application
The application has two operational modes, selected via command-line arguments in main.py11-57:
API Server Mode (HTTP REST):
# Explicit flag
python main.py --api

# OR short form
python main.py -a
MCP Server Mode:
# Explicit flag

python main.py --mcp

# OR short form

python main.py -m
Interactive Mode:
No flags - prompts for choice
python main.py
Non-interactive Default (API):
# Uses API mode by default without prompt

python main.py --yes

# OR

python main.py -y
Mode Selection Logic
The main.py39-53 implements a priority-based decision tree:
- If
--apiflag present → Start API server - Else if
--mcpflag present → Start MCP server - Else if
--yesflag present → Default to API server - Else → Prompt user interactively
Verification
API Server Mode Verification
Once the API server starts, verify it's running:
# Test health endpoint

curl http://localhost:5454/health

# Expected response:

# {"status": "ok"}
The API server exposes 11+ routers covering:
- Health monitoring
- GitHub repository analysis
- Website content processing
- YouTube video processing
- Google web search
- Gmail integration
- Calendar integration
- PyJIIT webportal access
- React Agent (conversational AI)
- Website validator
- Browser automation script generation
MCP Server Mode Verification
The MCP server operates over stdio and integrates with Claude Desktop or other MCP-compatible clients. Verify by checking that the process starts without errors and accepts stdin/stdout communication.
Configuration Verification
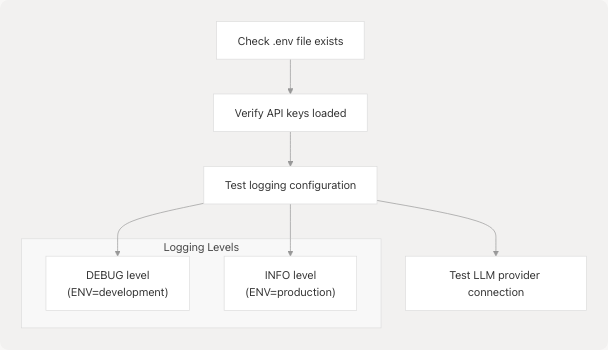
Verify configuration loading by checking the logs. The logging system configured in core/config.py16-25 will output:
DEBUGlevel logs in development mode (ENV=development)INFOlevel logs in production mode (ENV=production)
Common Issues
Missing Dependencies
If you encounter import errors:
# Reinstall dependencies
uv sync --reinstall
# OR
pip install -e . --force-reinstall
Environment Variable Not Found
The application uses core/config.py5-6 to load .env files. Ensure:
.envfile exists in project root- Variables are in
KEY=valueformat (no quotes needed) - No spaces around
=sign
Port Already in Use
If port 5454 is occupied, set a different port:
BACKEND_PORT=8080 python main.py --api
The port configuration is read from core/config.py11 with default value 5454.
Next Steps
After successfully starting the application:
- Explore the API: Review FastAPI Application and Router Architecture for available endpoints
- Configure Integrations: See Configuration and Environment Variables for service-specific setup
- Understand Agents: Learn about the Agent Intelligence System for AI capabilities
- Try the Extension: Set up the Browser Extension for frontend automation