Development Guide
Purpose and Scope
This guide provides practical instructions for developers who want to set up, run, and contribute to the TalentSync codebase. It covers local development environment setup, project structure, common development workflows, testing procedures, and troubleshooting steps. For deployment and production infrastructure details, see Deployment & Infrastructure. For detailed API endpoint documentation, see API Documentation.
Prerequisites
Before setting up the development environment, ensure you have the following tools installed:
| Tool | Minimum Version | Purpose |
|---|---|---|
| Bun | 1.x | Frontend package manager and runtime |
| Python | 3.13+ | Backend runtime |
| Node.js | 20.6.2 | Required by some Next.js tooling |
| PostgreSQL | 16.x | Database server |
| Git | 2.x | Version control |
| Docker (optional) | 20.x | Container runtime for full-stack setup |
| Docker Compose (optional) | 2.x | Multi-container orchestration |
Sources: frontend/package.json49 backend/Dockerfile2 docker-compose.yaml5
Project Structure Overview
The repository follows a monorepo structure with clear separation between frontend and backend:
AI-Resume-Parser/
├── frontend/              # Next.js application
│   ├── app/              # Next.js 13+ app directory (routes)
│   ├── components/       # Reusable React components
│   ├── lib/             # Utility functions and shared logic
│   ├── prisma/          # Prisma schema and migrations
│   ├── public/          # Static assets and PWA files
│   ├── package.json     # Frontend dependencies
│   ├── next.config.js   # Next.js configuration
│   └── Dockerfile       # Frontend container image
│
├── backend/             # FastAPI application
│   ├── app/            # Main application code
│   │   ├── main.py    # FastAPI entry point
│   │   ├── server.py  # Additional server configuration
│   │   ├── routes/    # API route handlers
│   │   ├── services/  # Business logic and AI services
│   │   └── model/     # ML models and data
│   ├── uploads/       # File upload storage
│   ├── pyproject.toml # Python dependencies
│   └── Dockerfile     # Backend container image
│
├── docker-compose.yaml # Multi-service orchestration
├── .env               # Environment variables (not in repo)
└── .gitignore         # Git ignore rules
Sources: .gitignore1-59 frontend/package.json1-98 docker-compose.yaml1-78
Local Development Architecture
The following diagram shows how services communicate in a local development environment:
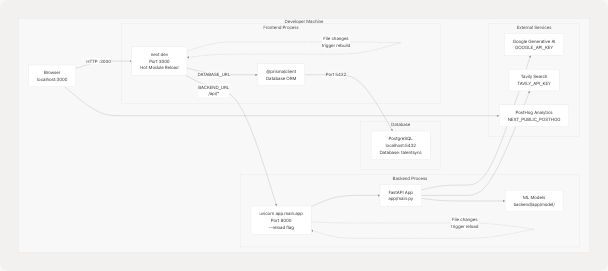
Key Differences from Production:
- Development uses
next devwith hot reload instead of production build - Backend runs with
--reloadflag for automatic restarts - Services communicate via
localhostinstead of Docker network names - Environment variables loaded from
.envfile in project root - No Nginx proxy; frontend exposed directly on port 3000
Sources: frontend/package.json6 backend/Dockerfile32 docker-compose.yaml58-60 frontend/next.config.js1-82
Environment Configuration
Creating the .env File
Create a .env file in the project root with the following structure:
# Database Configuration
POSTGRES_DB=talentsync
POSTGRES_USER=postgres
POSTGRES_PASSWORD=your_secure_password
DATABASE_URL="postgresql://postgres:your_secure_password@localhost:5432/talentsync?schema=public"

# NextAuth Configuration
NEXTAUTH_SECRET=generate_with_openssl_rand_base64_32
NEXTAUTH_URL=http://localhost:3000

# OAuth Providers (optional for development)
GOOGLE_CLIENT_ID=your_google_client_id
GOOGLE_CLIENT_SECRET=your_google_client_secret
GITHUB_CLIENT_ID=your_github_client_id
GITHUB_CLIENT_SECRET=your_github_client_secret

# Email Configuration (optional for development)
EMAIL_SERVER_USER=your_email@gmail.com
EMAIL_SERVER_PASSWORD=your_app_password
EMAIL_SERVER_HOST=smtp.gmail.com
EMAIL_SERVER_PORT=587
EMAIL_FROM=noreply@yourdomain.com

# Backend Configuration
BACKEND_URL=http://localhost:8000

# AI Service Keys (required)
GOOGLE_API_KEY=your_google_gemini_api_key
TAVILY_API_KEY=your_tavily_search_api_key

# PostHog Analytics (optional for development)
NEXT_PUBLIC_POSTHOG_KEY=your_posthog_key
NEXT_PUBLIC_POSTHOG_HOST=http://localhost:3000/ph

# JWT Secrets
JWT_SECRET=generate_with_openssl_rand_base64_32
JWT_REFRESH_SECRET=generate_with_openssl_rand_base64_32

# Environment
NODE_ENV=development
Environment Variable Priority:
- Docker Compose uses
.envfile viaenv_filedirective - Frontend build-time variables must be prefixed with
NEXT_PUBLIC_ - Backend accesses all variables directly via
os.getenv() - NextAuth requires
NEXTAUTH_SECRETandNEXTAUTH_URL
Sources: docker-compose.yaml7-62 frontend/next.config.js8-79 .gitignore32-55
Frontend Development Setup
Installation Steps
The following diagram shows the complete frontend setup workflow:
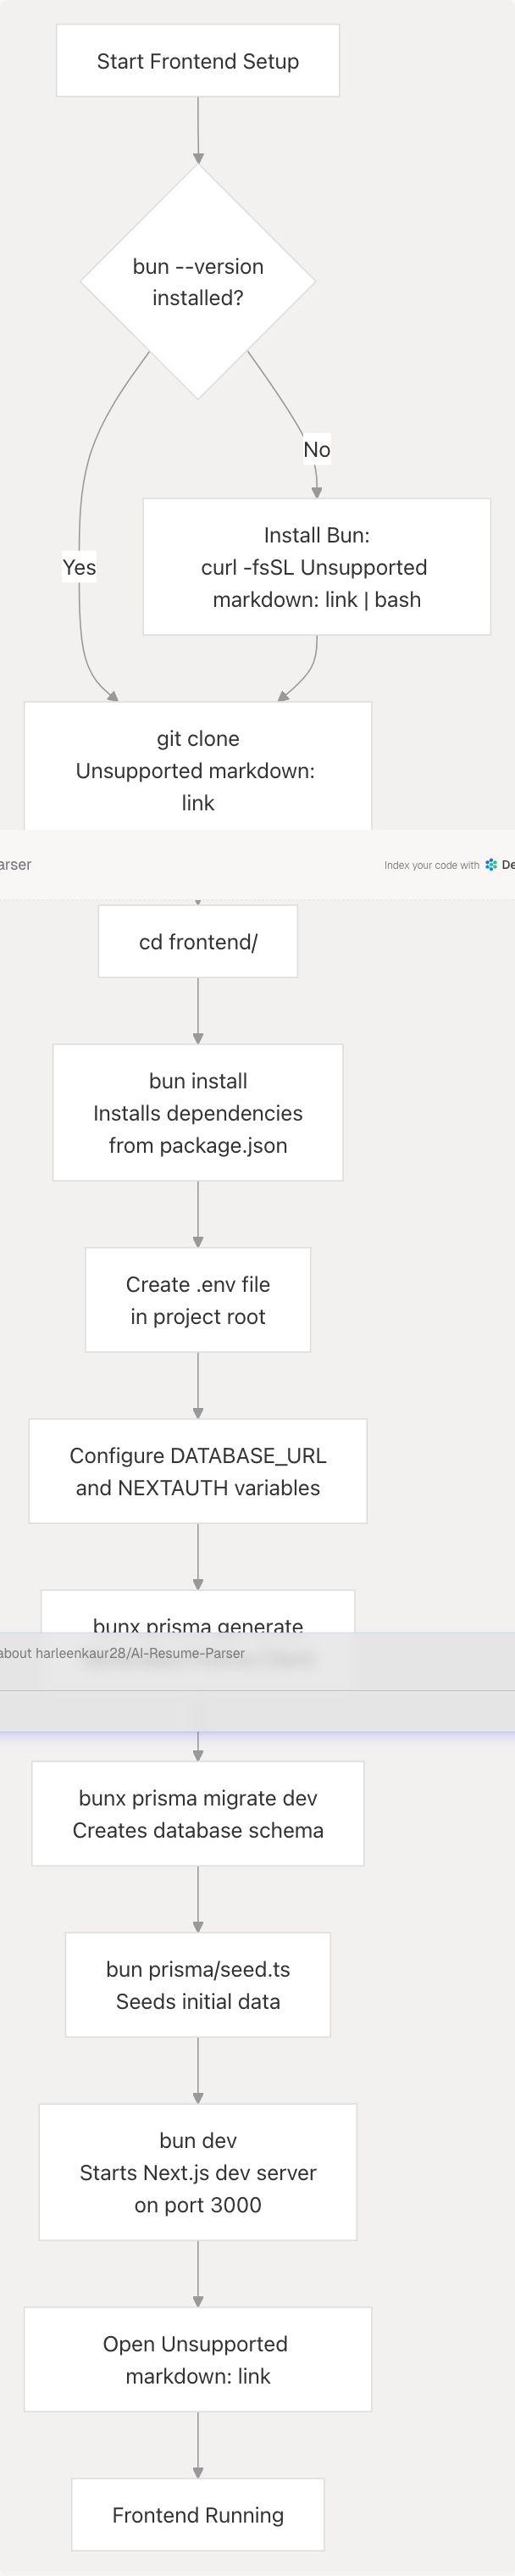
Commands Explained
# Navigate to frontend directory
cd frontend

# Install all dependencies from package.json
bun install

# Generate Prisma Client based on schema
bunx prisma generate

# Run database migrations
bunx prisma migrate dev --name init

# Seed the database with initial data
bun prisma/seed.ts

# Start development server with hot reload
bun dev
The frontend will be available at http://localhost:3000. The bun dev script runs next dev which enables:
- Fast Refresh (hot module replacement)
- Error overlay for debugging
- TypeScript type checking
- Automatic routing based on
app/directory structure
Sources: frontend/package.json5-12 frontend/next.config.js1-82
Backend Development Setup
Installation Steps
# Navigate to backend directory
cd backend

# Create Python virtual environment (recommended)
python -m venv venv
source venv/bin/activate  # On Windows: venv\Scripts\activate

# Install uv package manager (faster than pip)
pip install uv

# Install all dependencies including dev group
uv pip install -e ".[dev]"

# Start FastAPI development server with auto-reload
uvicorn app.main:app --host 0.0.0.0 --port 8000 --reload
The backend will be available at http://localhost:8000. FastAPI provides automatic interactive API documentation at:
- Swagger UI:
http://localhost:8000/docs - ReDoc:
http://localhost:8000/redoc
Backend File Structure:
backend/app/
├── main.py                    # FastAPI app initialization, CORS, routes
├── server.py                  # Additional server configuration
├── routes/                    # API endpoint handlers
│   ├── resume_routes.py      # /analyze_resume endpoint
│   ├── ats_routes.py         # /ats-evaluation endpoints
│   ├── cold_mail_routes.py   # /cold-mail/* endpoints
│   └── ...
├── services/                  # Business logic services
│   ├── resume_parser.py      # Text extraction, classification
│   ├── ats_evaluator.py      # Job matching logic
│   ├── cold_mail_service.py  # Email generation
│   └── agents/               # Web search, GitHub, content agents
└── model/                     # ML models and data
    ├── best_model.pkl        # Pre-trained job classifier
    ├── tfidf.pkl             # TF-IDF vectorizer
    └── nltk_data/            # NLP resources
Sources: backend/Dockerfile1-33 backend/pyproject.toml (implied)
Running the Full Stack with Docker Compose
For a production-like environment locally:
# From project root
docker-compose up --build

# Or run in detached mode
docker-compose up -d --build

# View logs
docker-compose logs -f

# Stop all services
docker-compose down

# Stop and remove volumes (clears database)
docker-compose down -v
Docker Compose Services:
| Service | Internal Port | External Port | Description |
|---|---|---|---|
db |
5432 | Not exposed | PostgreSQL database |
backend |
8000 | Not exposed | FastAPI application |
frontend |
3000 | 3000 | Next.js application |
Service Communication in Docker:
- Frontend connects to backend via
http://backend:8000 - Frontend connects to database via
postgresql://postgres:password@db:5432/talentsync - Services communicate over
TalentSyncDocker network
Sources: docker-compose.yaml1-78 backend/Dockerfile1-33
Development Workflow
Typical Development Cycle
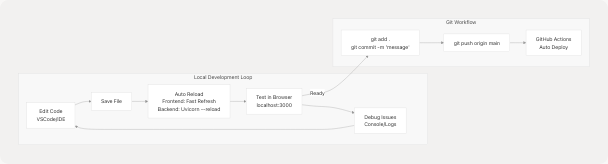
Making Changes
Frontend Changes:
- Edit files in
frontend/app/,frontend/components/, orfrontend/lib/ - Save - Next.js Fast Refresh updates browser automatically
- Check browser console for errors
- View changes immediately without manual refresh
Backend Changes:
- Edit files in
backend/app/routes/orbackend/app/services/ - Save - Uvicorn detects changes and reloads automatically
- Check terminal for reload confirmation
- Test API at
http://localhost:8000/docs
Database Schema Changes:
# 1. Edit frontend/prisma/schema.prisma
# 2. Create migration
bunx prisma migrate dev --name your_migration_name

# 3. Generate updated Prisma Client
bunx prisma generate

# 4. Restart frontend dev server to use new types
Sources: frontend/package.json6-12 backend/Dockerfile32
Key Development Commands
Frontend Commands
# Development
bun dev                           # Start dev server (port 3000)
bun run build                     # Production build
bun run start                     # Start production server
bun run lint                      # Run ESLint

# Database
bunx prisma studio                # Open Prisma Studio GUI
bunx prisma migrate dev           # Run migrations
bunx prisma migrate reset         # Reset database
bunx prisma generate              # Generate Prisma Client
bun prisma/seed.ts               # Seed database

# PWA
bun run generate:icons           # Generate PWA icons

# Dependencies
bun install                       # Install dependencies
bun add <package>                # Add dependency
bun add -d <package>             # Add dev dependency
bun update                       # Update dependencies
Sources: frontend/package.json5-16
Backend Commands
# Development
uvicorn app.main:app --reload     # Start with auto-reload
uvicorn app.main:app --host 0.0.0.0 --port 8000  # Production-like

# Testing (if implemented)
pytest                            # Run all tests
pytest tests/test_resume.py      # Run specific test file
pytest -v                        # Verbose output

# Dependencies
pip install uv                   # Install uv package manager
uv pip install -e ".[dev]"      # Install with dev dependencies
uv pip list                      # List installed packages
Sources: backend/Dockerfile12-22 backend/Dockerfile32
Database Management
Prisma Studio
Prisma Studio provides a GUI for database management:
cd frontend
bunx prisma studio
Opens at http://localhost:5555 with visual interface to:
- Browse all tables
- Create, edit, delete records
- Filter and search data
- View relationships
Common Database Operations
# Reset database (WARNING: deletes all data)
bunx prisma migrate reset

# View migration status
bunx prisma migrate status

# Create a new migration from schema changes
bunx prisma migrate dev --name add_new_field

# Deploy migrations (production)
bunx prisma migrate deploy

# Generate Prisma Client after schema changes
bunx prisma generate

# Seed database with sample data
bun prisma/seed.ts
Database Connection in Code:
Frontend: Uses @prisma/client generated from schema
// Imported as:
import { PrismaClient } from '@prisma/client'
const prisma = new PrismaClient()
Backend: Connects via standard PostgreSQL libraries or through frontend API
Sources: frontend/package.json11-15 docker-compose.yaml4-17
Testing Strategy
Frontend Testing
The project currently uses manual testing through the browser. Recommended testing setup:
# Install testing dependencies (not currently in package.json)
bun add -d @testing-library/react @testing-library/jest-dom vitest

# Run tests (once implemented)
bun test
Manual Testing Checklist:
- Test authentication flow (register, login, logout)
- Upload resume and verify analysis
- Generate cold mail and verify content
- Test ATS evaluation with job description
- Verify LinkedIn post generation
- Check responsive design on mobile/tablet
- Test PWA installation and offline capability
Sources: frontend/package.json90-97
Backend Testing
# Run FastAPI test client
cd backend
pytest

# Test specific service
pytest tests/test_resume_parser.py -v

# Test with coverage
pytest --cov=app tests/
API Testing Tools:
- FastAPI auto-generated docs at
http://localhost:8000/docs - Use "Try it out" feature to test endpoints directly
- Postman/Insomnia for complex request chains
curlfor command-line testing
Example curl test:
# Test resume upload endpoint
curl -X POST "http://localhost:8000/analyze_resume" \
  -F "file=@resume.pdf" \
  -F "showInCentral=true" \
  -F "customName=Test Resume"
Sources: backend/Dockerfile20
Debugging
Frontend Debugging
Browser DevTools:
- Open Chrome/Firefox DevTools (F12)
- Check Console tab for errors
- Use Network tab to inspect API calls
- React DevTools extension for component inspection
Next.js Specific:
- Error overlay appears automatically on errors
- Check terminal for server-side errors
- Use
console.log()statements (appear in browser console for client components, terminal for server components)
PostHog Debugging:
// Check if PostHog is loaded
console.log(window.posthog)

// Verify events are firing
window.posthog?.capture('test_event', { property: 'value' })
Sources: frontend/next.config.js18-64
Backend Debugging
FastAPI Logging:
# Backend uses standard Python logging
import logging
logger = logging.getLogger(__name__)

logger.debug("Debug message")
logger.info("Info message")
logger.error("Error message")
Common Backend Issues:
| Issue | Solution |
|---|---|
ModuleNotFoundError |
Run uv pip install -e ".[dev]" |
GOOGLE_API_KEY not found |
Check .env file in project root |
| Model file not found | Ensure backend/app/model/ contains .pkl files |
| NLTK data missing | Set NLTK_DATA=/app/model/nltk_data |
| Port 8000 already in use | Kill existing process: `lsof -ti:8000 |
Interactive Debugging:
# Use Python debugger
import pdb; pdb.set_trace()

# Or use ipdb (install with: pip install ipdb)
import ipdb; ipdb.set_trace()
Sources: backend/Dockerfile5-6 backend/Dockerfile32
Environment-Specific Configuration
Development vs Production
The application behavior changes based on NODE_ENV:
// frontend/next.config.js
const withPWA = require("next-pwa")({
  dest: "public",
  register: true,
  skipWaiting: true,
  disable: process.env.NODE_ENV === "development", // PWA disabled in dev
});
Key Differences:
| Feature | Development | Production |
|---|---|---|
| PWA | Disabled | Enabled |
| Hot Reload | Enabled | Disabled |
| Source Maps | Full | Minimal |
| Error Overlay | Enabled | Disabled |
| Image Optimization | Disabled | Enabled |
| Code Minification | Disabled | Enabled |
| API Base URL | localhost:8000 |
backend:8000 (Docker) |
Sources: frontend/next.config.js1-6 docker-compose.yaml56-60
Progressive Web App (PWA) Development
Service Worker
The application uses next-pwa to generate a service worker automatically. Configuration in next.config.js:
const withPWA = require("next-pwa")({
  dest: "public",           // Output directory
  register: true,           // Auto-register service worker
  skipWaiting: true,        // Activate new SW immediately
  disable: process.env.NODE_ENV === "development",
});
Generated Files:
public/sw.js- Service worker scriptpublic/workbox-*.js- Workbox runtimepublic/manifest.json- PWA manifest
Testing PWA:
- Build production version:
bun run build && bun run start - Open Chrome DevTools > Application tab
- Check "Service Workers" section
- Test offline mode: Toggle "Offline" in Network tab
Sources: frontend/next.config.js1-6
Working with External Services
Google Generative AI (Gemini)
API Key Setup:
- Obtain API key from Google AI Studio
- Add to
.env:GOOGLE_API_KEY=your_key_here - Backend accesses via
os.getenv("GOOGLE_API_KEY")
Models Used:
gemini-2.0-flash-exp- Primary LLM for most tasks- Temperature: 0.1 for consistent outputs
Tavily Search API
Configuration:
# In .env
TAVILY_API_KEY=your_tavily_key
Used by backend for company research and web search in:
- ATS Evaluation service
- Tailored Resume service
- LinkedIn services
PostHog Analytics
Configuration:
# In .env
NEXT_PUBLIC_POSTHOG_KEY=your_key
NEXT_PUBLIC_POSTHOG_HOST=http://localhost:3000/ph
Proxy Setup: Frontend proxies PostHog requests to avoid ad blockers:
// next.config.js
async rewrites() {
  return [
    {
      source: "/ph/static/:path*",
      destination: "https://eu-assets.i.posthog.com/static/:path*",
    },
    {
      source: "/ph/:path*",
      destination: "https://eu.i.posthog.com/:path*",
    },
  ];
}
Sources: frontend/next.config.js65-76
Common Troubleshooting
Frontend Issues
Issue: Module not found: Can't resolve '@prisma/client'
# Solution: Generate Prisma Client
bunx prisma generate
Issue: Database connection failed
# Solution: Check PostgreSQL is running
pg_isready -h localhost -p 5432

# Start PostgreSQL if needed (macOS)
brew services start postgresql@16

# Or using Docker
docker run --name postgres -e POSTGRES_PASSWORD=password -p 5432:5432 -d postgres:16
Issue: Next.js port 3000 already in use
# Solution: Kill existing process
lsof -ti:3000 | xargs kill -9

# Or use different port
PORT=3001 bun dev
Issue: OAuth login not working
# Solution: Verify callback URLs
# Google: http://localhost:3000/api/auth/callback/google
# GitHub: http://localhost:3000/api/auth/callback/github
Backend Issues
Issue: ImportError: No module named 'app'
# Solution: Install dependencies
cd backend
uv pip install -e ".[dev]"
Issue: FileNotFoundError: best_model.pkl not found
# Solution: Ensure ML models are present
ls backend/app/model/
# Should contain: best_model.pkl, tfidf.pkl, nltk_data/
Issue: GOOGLE_API_KEY environment variable not set
# Solution: Create .env file in project root
echo "GOOGLE_API_KEY=your_key" >> .env

# Verify it's loaded
python -c "import os; print(os.getenv('GOOGLE_API_KEY'))"
Database Issues
Issue: Prisma schema out of sync with database
# Solution: Run migrations
bunx prisma migrate dev

# Or reset database (WARNING: deletes data)
bunx prisma migrate reset
Issue: Connection timeout to database
# Solution: Check DATABASE_URL format
# Correct: postgresql://user:password@localhost:5432/dbname?schema=public

# Verify PostgreSQL is accepting connections
psql -h localhost -U postgres -d talentsync
Sources: .gitignore1-59 docker-compose.yaml9-17
Git Workflow Best Practices
Branch Strategy
# Main branch for production
main

# Create feature branch
git checkout -b feature/your-feature-name

# Create bugfix branch
git checkout -b bugfix/issue-description

# Make changes, commit
git add .
git commit -m "feat: add new feature"
git commit -m "fix: resolve bug"

# Push to remote
git push origin feature/your-feature-name
Commit Message Convention
Follow conventional commits format:
type(scope): subject

body (optional)

footer (optional)
Types:
feat:New featurefix:Bug fixdocs:Documentation changesstyle:Code style changes (formatting)refactor:Code refactoringtest:Adding testschore:Maintenance tasks
Examples:
git commit -m "feat(resume): add PDF export functionality"
git commit -m "fix(auth): resolve OAuth callback error"
git commit -m "docs(api): update endpoint documentation"
Pre-commit Checklist
Before pushing code:
- Code runs without errors locally
- Linter passes:
bun run lint(frontend) - No console.log statements in production code
- Environment variables documented if new ones added
- No sensitive data in commits (.env excluded)
- Migrations created if database schema changed
- Dependencies added to package.json/pyproject.toml if new packages used
Sources: .gitignore1-59
Performance Optimization Tips
Frontend Performance
Image Optimization:
// next.config.js
images: {
  unoptimized: true, // Set to false for production
  domains: ["lh3.googleusercontent.com", "avatars.githubusercontent.com"],
}
Code Splitting:
- Next.js automatically code-splits pages
- Use dynamic imports for heavy components:
import dynamic from 'next/dynamic'
const HeavyComponent = dynamic(() => import('./HeavyComponent'))
Bundle Analysis:
# Install bundle analyzer
bun add -d @next/bundle-analyzer

# Analyze bundle
ANALYZE=true bun run build
Backend Performance
Caching:
- Consider implementing Redis for API response caching
- Cache ML model predictions for repeated resumes
- Use in-memory cache for frequently accessed data
Database Queries:
- Use Prisma's
selectto fetch only needed fields - Add database indexes for frequently queried columns
- Use connection pooling for database connections
Sources: frontend/next.config.js13-16
IDE Setup Recommendations
VS Code Extensions
Recommended extensions for development:
{
  "recommendations": [
    "dbaeumer.vscode-eslint",
    "esbenp.prettier-vscode",
    "Prisma.prisma",
    "ms-python.python",
    "ms-python.vscode-pylance",
    "bradlc.vscode-tailwindcss",
    "firsttris.vscode-jest-runner"
  ]
}
VS Code Settings
{
  "editor.formatOnSave": true,
  "editor.codeActionsOnSave": {
    "source.fixAll.eslint": true
  },
  "[typescript]": {
    "editor.defaultFormatter": "esbenp.prettier-vscode"
  },
  "[python]": {
    "editor.defaultFormatter": "ms-python.python"
  }
}
Next Steps
After setting up your development environment:
-
Explore the codebase:
- Review Frontend Architecture for UI structure
- Study Backend Services for API implementation
- Understand Database Schema for data models
-
Try common workflows:
- Upload a test resume through the UI
- Generate a cold email using the API
- Modify a component and see hot reload in action
-
Read API documentation:
- See API Documentation for endpoint details
- Use FastAPI docs at
http://localhost:8000/docs
-
Contribute:
- Pick an issue from the GitHub repository
- Follow the Git workflow outlined above
- Submit a pull request for review
Sources: frontend/package.json1-98 docker-compose.yaml1-78 backend/Dockerfile1-33