Local Development Setup
Purpose and Scope
This document provides step-by-step instructions for setting up the TalentSync development environment on a local machine. It covers installing prerequisites, configuring environment variables, setting up the database, and running the frontend and backend services in development mode.
For information about deployment and production configuration, see Deployment & Infrastructure. For API documentation and testing endpoints, see API Documentation.
Prerequisites
The following tools and versions are required for local development:
| Tool | Version | Purpose |
|---|---|---|
| Bun | Latest | Frontend package manager and runtime |
| Node.js | 20.x | JavaScript runtime (fallback) |
| Python | 3.13+ | Backend runtime |
| uv | Latest | Python package installer |
| PostgreSQL | 16+ | Database server |
| Git | Latest | Version control |
Operating System: Linux, macOS, or Windows with WSL2
Hardware Requirements:
- 8GB RAM minimum (16GB recommended for ML model loading)
- 10GB free disk space
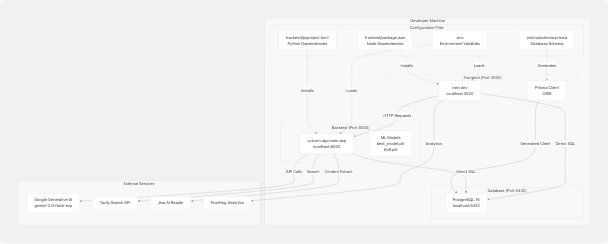
Development Environment Architecture
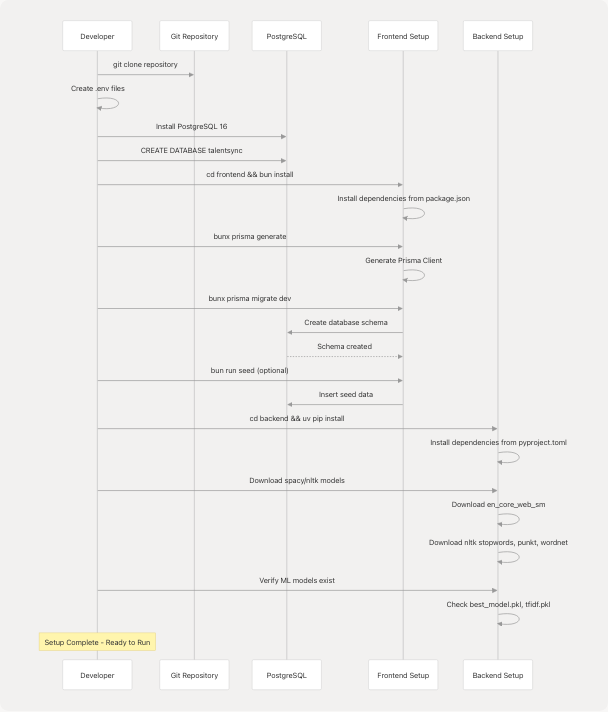
Repository Setup
1. Clone the Repository
git clone https://github.com/harleenkaur28/AI-Resume-Parser.git
cd AI-Resume-Parser
2. Directory Structure
The repository has the following key directories:
AI-Resume-Parser/
├── frontend/               # Next.js application
│   ├── app/               # Next.js App Router pages
│   ├── components/        # React components
│   ├── prisma/           # Prisma schema and migrations
│   ├── package.json      # Node dependencies
│   └── .env.local        # Frontend environment variables
├── backend/               # FastAPI application
│   ├── app/              # Python application code
│   │   ├── main.py      # FastAPI entry point
│   │   ├── server.py    # API routes
│   │   └── model/       # ML models and utilities
│   ├── pyproject.toml   # Python dependencies
│   └── uploads/         # Resume file storage
├── .env                  # Shared environment variables
└── docker-compose.yaml  # Production deployment config
Environment Configuration
3. Create Environment Files
TalentSync uses environment variables for configuration. Create two files:
Root .env File
Create .env in the repository root:
# Database Configuration
POSTGRES_DB=talentsync
POSTGRES_USER=postgres
POSTGRES_PASSWORD=your_secure_password_here

# Database URLs
DATABASE_URL="postgresql://postgres:your_secure_password_here@localhost:5432/talentsync?schema=public"

# NextAuth Configuration
NEXTAUTH_SECRET=generate_a_random_secret_here_min_32_chars
NEXTAUTH_URL=http://localhost:3000

# Google OAuth (Optional - for Google sign-in)
GOOGLE_CLIENT_ID=your_google_client_id
GOOGLE_CLIENT_SECRET=your_google_client_secret

# GitHub OAuth (Optional - for GitHub sign-in)
GITHUB_CLIENT_ID=your_github_client_id
GITHUB_CLIENT_SECRET=your_github_client_secret

# Email Configuration (for verification emails)
EMAIL_SERVER_USER=your_email@gmail.com
EMAIL_SERVER_PASSWORD=your_app_password
EMAIL_SERVER_HOST=smtp.gmail.com
EMAIL_SERVER_PORT=587
EMAIL_FROM=noreply@talentsync.com

# AI/ML API Keys
GOOGLE_API_KEY=your_google_gemini_api_key
TAVILY_API_KEY=your_tavily_api_key

# Backend Configuration
BACKEND_URL=http://localhost:8000

# PostHog Analytics (Optional)
NEXT_PUBLIC_POSTHOG_KEY=your_posthog_key
NEXT_PUBLIC_POSTHOG_HOST=https://eu.i.posthog.com

# JWT Configuration
JWT_SECRET_KEY=generate_another_random_secret_here
JWT_ALGORITHM=HS256
ACCESS_TOKEN_EXPIRE_MINUTES=30
REFRESH_TOKEN_EXPIRE_DAYS=7
Generate Secrets
Generate secure random secrets for NEXTAUTH_SECRET and JWT_SECRET_KEY:
# Generate NEXTAUTH_SECRET
openssl rand -base64 32

# Generate JWT_SECRET_KEY
openssl rand -base64 32
Frontend .env.local File
Create frontend/.env.local (symlink or copy from root .env):
cd frontend
ln -s ../.env .env.local
Database Setup
4. Install and Start PostgreSQL
On macOS (using Homebrew):
brew install postgresql@16
brew services start postgresql@16
On Ubuntu/Debian:
sudo apt update
sudo apt install postgresql-16 postgresql-contrib
sudo systemctl start postgresql
On Windows (WSL2):
Follow Ubuntu instructions above.
5. Create Database
# Connect to PostgreSQL
psql -U postgres

# Create database
CREATE DATABASE talentsync;

# Verify connection string matches .env
\c talentsync
\q
Frontend Setup
6. Install Bun
# On macOS/Linux
curl -fsSL https://bun.sh/install | bash

# On Windows (WSL2)
curl -fsSL https://bun.sh/install | bash
7. Install Frontend Dependencies
cd frontend
bun install
This installs all dependencies from frontend/package.json17-89:
next(^15.5.6) - Next.js framework@prisma/client(^6.9.0) - Database ORMnext-auth(^4.24.11) - Authenticationprisma(^6.9.0) - Database toolkit- UI libraries (Radix UI components, Tailwind CSS)
8. Generate Prisma Client
cd frontend
bunx prisma generate
This generates the Prisma client from the schema at frontend/prisma/schema.prisma
9. Run Database Migrations
bunx prisma migrate dev --name init
This creates the database schema with the following models:
User- User accountsAccount- OAuth accountsSession- User sessionsVerificationToken- Email verification tokensPasswordResetToken- Password reset tokensResume- Uploaded resumesAnalysis- Resume analysis resultsColdMailGeneration- Generated cold emailsInterviewAnswer- Interview preparation answers
10. Seed the Database (Optional)
bun run seed
This executes frontend/prisma/seed.ts to populate initial data.
Backend Setup
11. Install uv (Python Package Installer)
# On macOS/Linux
curl -LsSf https://astral.sh/uv/install.sh | sh

# On Windows (PowerShell)
powershell -c "irm https://astral.sh/uv/install.ps1 | iex"
12. Install Backend Dependencies
cd ../backend
uv pip install --system ".[dev]"
This installs dependencies from backend/pyproject.toml including:
fastapi- Web frameworkuvicorn- ASGI serverlangchain- LLM orchestrationlangchain-google-genai- Google Gemini integrationscikit-learn- ML classificationspacy- NLP processingPyPDF2- PDF parsingpython-docx- DOCX parsing
13. Download NLP Models
python -c "import spacy; spacy.cli.download('en_core_web_sm')"
python -c "import nltk; nltk.download('stopwords'); nltk.download('punkt'); nltk.download('wordnet')"
14. Verify ML Models
Ensure the pre-trained models exist:
ls -l app/model/
Expected files:
best_model.pkl- Pre-trained job category classifiertfidf.pkl- TF-IDF vectorizerCategorized_Professional_Skills.csv- Skills database
These models are used by backend/app/model/ for resume classification.
Setup Workflow Diagram
Running the Development Servers
15. Start Backend Server
Open a terminal window:
cd backend
uvicorn app.main:app --reload --host 0.0.0.0 --port 8000
The --reload flag enables auto-restart on code changes. The backend will be available at http://localhost:8000.
Verify Backend
Open http://localhost:8000/docs to view the FastAPI Swagger UI with all API endpoints.
16. Start Frontend Server
Open a second terminal window:
cd frontend
bun run dev
This starts the Next.js development server as defined in frontend/package.json6 The frontend will be available at http://localhost:3000.
The development server includes:
- Hot Module Replacement (HMR) for instant updates
- Error overlay for debugging
- Source maps for debugging compiled code
17. Development Mode Features
Frontend (Port 3000):
- Next.js Fast Refresh for React components
- Prisma Studio access via
bunx prisma studio - NextAuth authentication at
/api/auth/* - PWA disabled in development (frontend/next.config.js5)
Backend (Port 8000):
- Auto-reload on file changes
- Interactive API documentation at
/docs - Alternative docs at
/redoc - CORS enabled for
localhost:3000
Service Connection Map
Verification Steps
18. Test Database Connection
cd frontend
bunx prisma studio
This opens Prisma Studio at http://localhost:5555 for database inspection.
19. Test Backend API
curl http://localhost:8000/docs
Or open http://localhost:8000/docs in a browser. You should see the FastAPI Swagger documentation.
20. Test Frontend
Navigate to http://localhost:3000 and verify:
- Landing page loads
- Navigation works
- Authentication redirects to
/auth
21. Test Full Stack Integration
- Navigate to
http://localhost:3000/auth - Register a new account
- Verify email functionality (check console logs if email not configured)
- Log in
- Upload a resume at
/dashboard/seeker - Verify analysis completes and results display
Configuration File Reference
| File | Purpose | Key Configuration |
|---|---|---|
.env |
Shared environment variables | Database URLs, API keys, secrets |
frontend/.env.local |
Frontend-specific overrides | Same as .env (symlinked) |
frontend/prisma/schema.prisma |
Database schema definition | Models, relations, indexes |
frontend/next.config.js |
Next.js configuration | PWA, PostHog, Webpack overrides |
backend/pyproject.toml |
Python dependencies | Package versions, dev dependencies |
frontend/package.json |
Node dependencies | Scripts, package versions |
Common Development Commands
Frontend Commands
# Development server
bun run dev

# Production build
bun run build

# Start production server
bun run start

# Generate Prisma client
bunx prisma generate

# Run migrations
bunx prisma migrate dev

# Reset database
bunx prisma migrate reset

# Open Prisma Studio
bunx prisma studio

# Seed database
bun run seed

# Generate PWA icons
bun run generate:icons

# Lint code
bun run lint
Backend Commands
# Development server with auto-reload
uvicorn app.main:app --reload --host 0.0.0.0 --port 8000

# Production server
uvicorn app.main:app --host 0.0.0.0 --port 8000

# Install dependencies
uv pip install --system ".[dev]"

# Install specific package
uv pip install --system package-name

# Download spacy model
python -m spacy download en_core_web_sm

# Download nltk data
python -c "import nltk; nltk.download('stopwords')"
Troubleshooting
Database Connection Errors
Error: Error: P1001: Can't reach database server
Solution: Verify PostgreSQL is running and connection string in .env matches:
psql -U postgres -d talentsync -c "SELECT 1"
Prisma Client Not Generated
Error: Cannot find module '@prisma/client'
Solution: Generate the Prisma client:
cd frontend
bunx prisma generate
Backend Import Errors
Error: ModuleNotFoundError: No module named 'fastapi'
Solution: Reinstall backend dependencies:
cd backend
uv pip install --system ".[dev]"
Port Already in Use
Error: Error: listen EADDRINUSE: address already in use :::3000
Solution: Kill the process using the port:
# Find process
lsof -i :3000

# Kill process
kill -9 <PID>
ML Model Files Missing
Error: FileNotFoundError: [Errno 2] No such file or directory: 'app/model/best_model.pkl'
Solution: Verify the model files exist in backend/app/model/. These files should be included in the repository.
Environment Variables Not Loaded
Error: ValueError: GOOGLE_API_KEY not set
Solution:
- Verify
.envfile exists in repository root - Verify
frontend/.env.localexists (symlink to../.env) - Restart development servers after modifying
.env
Next Steps
After completing the local development setup:
- API Testing: See API Documentation for endpoint reference
- Testing: See Testing Guide for running tests
- Database Schema: See Prisma Schema for detailed model documentation
- Deployment: See Docker Compose Setup when ready to deploy